{Kid Stuff} DIY Halloween Costume – Little Stinker

{Kid Stuff} DIY Halloween Costume – Little Stinker (Skunk)

{Kid Stuff} DIY Halloween Costume – Little Stinker (Skunk)

DIY Kids Halloween Costume Idea - Skunk

DIY Kids Halloween Costume Idea – Skunk

If you’re scrambling for a last minute Halloween costume for your little one, here’s a super simple DIY that you can put together in under an hour.

DIY Kids Halloween Costume Idea - Skunk

Little Stinker 😉

You may already have black pants & a shirt or sweatshirt that will work. The only other thing you need is some fake fur in black & white. Cut a circle of the white for the tummy. Cut a strip of black (about 6″ wide and 18″ long) and a slightly thinner strip of white. Attach the pieces however you feel most comfortable – if you sew, you may find it easiest to stitch this up with your sewing machine, a needle and thread will also get the job done, or, if you prefer, you can use fabric glue or even a hot glue gun (it’s just a costume after all, it doesn’t have to be fancy)! If you do use glue though, I recommend reinforcing the tail, at the base and top (bottom and neck) with a few stitches just to make sure it stays put.

DIY Kids Halloween Costume Idea - Skunk

Super simple skunk face paint (he wouldn’t hold still long enough for me to do any more)…

My squirmy little skunk wouldn’t hold still long enough for me to do anything more than swipe on a few whiskers and a triangle for his nose – but it still turned out pretty cute. (If you don’t have any face paint, you can use a soft black eyeliner pencil.)

* These photos were taken several years ago when my oldest son was 2. My younger son was 6 months old at the time, and no one in our house had gotten a proper night’s sleep in months (6, to be exact). In my sleep-deprived state, the costume thing sort of slipped my mind until the very last minute. When I realized that it was the morning of Halloween (seriously, how did that happen?!), I packed up both kids and schlepped them to the mall to buy a costume. I wasn’t picky – anything would do…but there was nothing. Nada. Not one single crappy, store-bought super hero suit. Not even a pirate eye-patch. The only thing on the rack was a princess dress, with an entire seam ripped out on one side, in a girl’s size 10. Tears welled up in my eyes, I very nearly had a full-blown mommy meltdown right there in the aisle of Target. Not only had I not had time to create a fabulous, Pinterest-worthy, DIY costume for my little boy, apparently I wasn’t even capable of buying him a costume (or even remembering that it was a holiday for that matter). I went home, feeling utterly defeated. It wasn’t until my grandma suggested, ‘Why don’t you just put a pillowcase over his head and cut some eye-holes? He can be a ghost! That’s what we used to do.’ And while I didn’t stick my toddler in a pillowcase, it did make me realize that it was just a Halloween costume for heaven’s sake…it didn’t need to be fancy. I riffled through my fabric stash and found a few pieces of fake fur leftover from another project. We already had a black t-shirt, and the pants were a last minute purchase from Goodwill. And voila, he was a skunk…and a darn cute one at that 😉

xo ~ Stacey

PS: Follow me on Pinterest for more costume ideas & Halloween inspiration!


{DIY} Fall Decor – Colorful Paper Leaves

This is a fun seasonal decorating project that you can do in less than an hour, and better yet, it costs next to nothing!

{DIY} Fall Decor - Colorful Paper Leaves

Dress Your Windows for Fall with these Colorful Paper Leaves

Continue reading

{DIY} Culinary Herb Wreath

{DIY} Cullinary Herb Wreath

{DIY} Cullinary Herb Wreath – Lavender, Rosemary & Bay Leaves

What do you do when you find yourself with a bounty of fresh herbs? Make a wreath, of course! And some bouquets…and maybe even a garland for the chicken coop 😉 Click on the image below for step-by-step photos showing how to make this simple wreath that’s as functional as it is pretty! Enjoy the subtle aroma of the herbs as they dry, plucking off a bit here and there, as needed, to use in the kitchen. –tutorial after the break– Continue reading

{DIY} Make a Garden Fairy House

{DIY} Garden Fairy House

Garden Fairy House

Add a bit of whimsy to your life with a DIY Garden Fairy House. This is a super fun project, and a great one to get your kids involved with! My 4-year-old helped me ‘decorate’ it with moss. The ‘welcome faeries’ sign was his idea too 😉 Continue reading

{DIY} Fresh Flower Crown with Mock Orange Blossoms

I have a fun DIY project to share with you today! This super simple fresh flower crown was made using flowers from my yard, and just a few other basic supplies. You can whip one of these up in under an hour, creating a perfect, one-of-a-kind accessory to complement your summertime ensemble.

{DIY} Fresh Flower Crown with Mock Orange Blossoms

{DIY} Fresh Flower Crown with Mock Orange Blossoms


Continue reading

{DIY} Friendship Bracelet Tutorial ~ Simple Diagonal Stripe

{DIY ~ Friendship Bracelet Tutorial} Learn how to make a diagonal stripe friendship bracelet.

{DIY ~ Friendship Bracelet Tutorial} Learn how to make a diagonal stripe friendship bracelet.

I had totally forgotten about these bracelets until just recently when my son came home from kindergarten proudly sporting a bracelet made from colorful elastic bands that his friend had made for him. The next time I was at his school, I spotted them on every wrist. Apparently they’re all the rage amongst the K-5 set. This conjured up fond childhood memories for me. Back in the 80’s, when I was in elementary school, friendship bracelets were all the rage. My friends and I would sit out on the playground on sunny days, talking and making bracelets for each other. I remembered how much fun I used to have making them, so I decided to make a one for each of my kids. Perhaps I can convince them that they’re cooler than those silly elastic things (doubtful, I admit).

Despite the many hours I had spent making these bracelets as a child, I wasn’t sure I would still remember how (it had been a VERY long time, after all). A few minutes of fiddling around with some embroidery thread answered that question quickly enough though. My hands set to work as though I were back in the 2nd grade. Apparently, some things you never forget 😉 Continue reading

{DIY} Twig Garden Markers ~ Anthropologie Knock-Off

How cute are these garden markers?! I ran across the Anthropologie version a while ago, and of course thought, I could totally make those…” So, now that garden season is upon us, I did! I am pleased to report that they were super fun & easy to make. So much so, in fact, that I think I may make some more as gifts. Tied up with a bit of twine, wouldn’t these would make a cute gift for a friend who loves to garden?

{DIY} Twig Plant Markers

{DIY} Twig Garden Markers

Continue reading

{DIY} Kool-Aid Playdough ~ Recipe & Instructions

If you’ve never made your own playdough before, this is the recipe to try. It’s super simple to make, and it turns out perfect every time. Plus, the Kool-Aid makes it smell yummy 😉

DIY Kool-Aid Playdough Recipe

DIY Kool-Aid Playdough Recipe

Continue reading

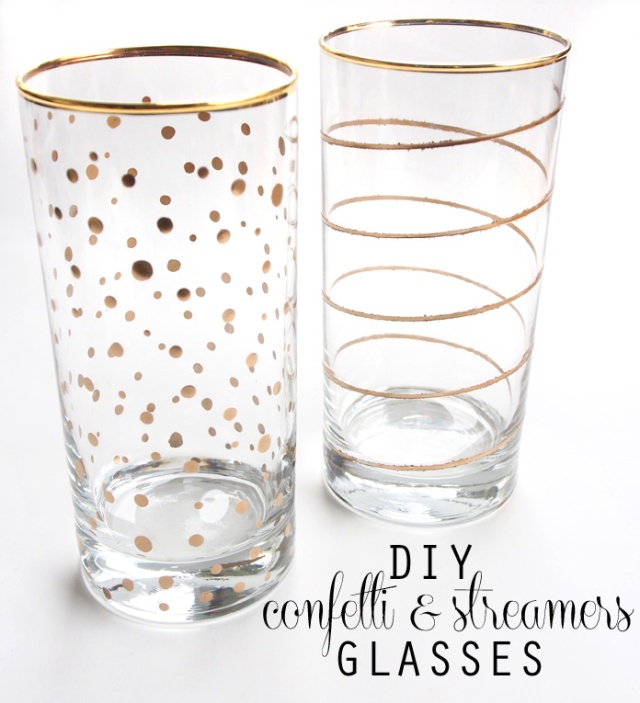
{DIY} Gold Painted Confetti & Streamers Glasses

Today’s DIY project was inspired by a gorgeous set of champagne flutes from BHLDN. I love the festive feel of the gold, and the mismatched (yet still coordinated) patterns are positively perfect. (Say that 3 times fast!) However, at $68 plus shipping for a set of 4, you had better either have a larger budget for glassware than I do, or keep your guest list to a minimum. So, I decided to try to create a ‘knock-off’ version on the cheap. Also, I wanted highball glasses, not champagne flutes. Here’s what I came up with…

DIY Gold Confetti & Streamers Glasses

DIY Gold Confetti & Streamers Glasses

Including these gold-rimmed glasses I found at the dollar store for, you guessed it $1, the total for this project was a little more than $17, BUT most of that was for the paint & sealant which I only used a teeny tiny bit of. So, you could make dozens of these glasses and the cost would only increase by the price of the glasses themselves. Plus, if you’re a crafty sort (which you probably are if you’re reading this post), I bet you can come up with a hundred and one ways to use up that extra gold paint. In fact, as I sit here typing this post, I can’t help but notice how plain my desk accessories look…gold stapler anyone?

Continue reading